
Maker Portfolio
By: Elizabeth Merrill
Maker Projects
 |  |
|---|---|
 |  |
 |  |
 |  |
 |  |
 |  |
 |  |
 |  |
 |
Scratch
Pen on repeat

For this project, I learned how to use the pen tool on repeat to make the pen draw. I also learned how to animate a sprite to make it look like it is moving fluidly. I chose to customize a project from the Scratch+ Makey Makey textbook.
When creating a sprite to write for you on repeat, it allows the user to create neat-looking patterns. The project in the book had the user add pen commands for the program to draw a shape that kind of resembles a flower. I did that and I got the flower pattern to appear. To customize it, I changed the background to one that was pink with a lighter pink circle in the middle. Then I duplicated the code twice so it would draw the flower 3 times. I changed the number of steps it would take each time before turning. This made the final flower drawn smaller or bigger. I also made each flower size a different color by changing the pen color for each repeat of the code. So, in the end, I have a large blue flower, a medium green flower, and a small pink flower.


Fish showing Depth
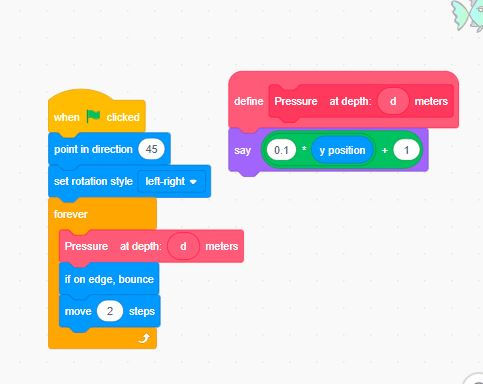
This project required that the code made so the fish would display how deep they are on the screen. This was a challenge because I couldn't get the code correct. After discussions with my peers, I was able to fix the code and get the fix to display their depths correctly. After getting that figured out I was able to play around with the fish movements. II also used the drawings of the sprites to change their colors and make them each look different.

Flower Flake with the Pen

I built the code to make a snowflake with spikes. Then using suggestions from the book, I altered the code to instead create flowers on stems. This code required the use of procedures. I created the procedure for the leaf, then the leaves to make a complete flower. Next, I created the branching procedure. Finally, I created the flowering procedure. After this, the final code for the snowflake ended with a ‘flower’ block rather than the ‘flake’ block. I then changed the leaves procedure to change the leaves' color to pink. To do this I added the change color block to the leaves procedure, then I added to change color again at the end of the repeat so the branch would turn back green.

Whac-A-Mole Game
For this project I learned all about using variables. The problem I adapted from the textbook was a Whac-a-mole game. This one took a lot of trial and error. I figured out how to add points when the sprite was clicked but I was having difficulties trying to add points to the misses section. After looking at some other users had completed, I realized that I could add code to the stage. I had never thought that the stage or background could actually have a function. When I did that, I was able to set when the stage got clicked to add up the misses. Then I changed both the misses and hits to equal 25. This way when either one hit 25 the game was over. Other things I changed were: how fast the sprite moved, what the sprite says when you win or lose, and the sound effects.


Triangle Game/Activity
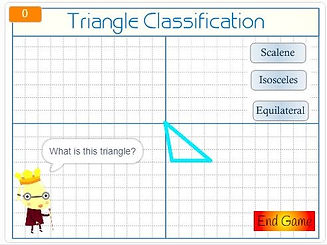
The triangle game was interesting to manipulate. The main function of the game was already in place but there was a lot to be added. As the books suggested, I added the score, made a quit game button, changed how many times the game repeats, made a bonus page, and made the buttons get brighter when hovering over them. To make the bonus round I created a new background that I added text to that shows “Bonus +5”. Then the game adds five more points. I also set a limit for the game to end. If the user gets -5 points they lose and a game over background pops up. If they get to 25points the game shows a new background that flashes the word ‘winner’. Finally, I added some sound effects. I really played around a lot with this game. I learned how to make a button, how to make the buttons change when the cursor hovers over them.


Scratch+Makey Makey
Ecosystems Activity
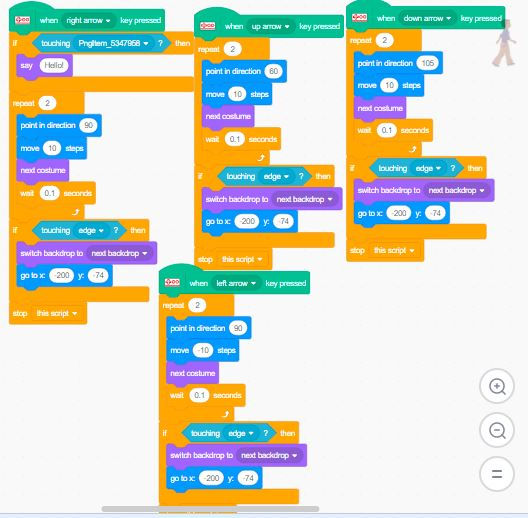
This project includes both Scratch and Makey Makey. This was the first project I have every made using both. I found inspiration to create a controller using the Makey Makey. This used a small shoe box as well as playdough and the Makey Makey agligator clips. Anything that is able to conduct electricity can be used as a touch sensor for the Makey Makey. After that I began coding the scratch program. This progrom had many sprites and many different backgrounds. The girl sprite walks through each ecosystem learning about the types of animals that live there. This would be a program I could have my students create or use my already created one to learn about Ecosystems.


Interactive Poster
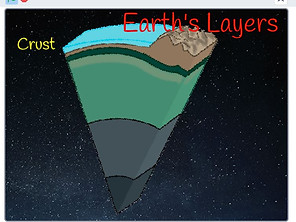

This weeks project was an interactive poster about Earths Layers. Geology is a large part of what I teach each year for 6th grade Science. A lot of our units include fun experiments or projects except this unit. There aren't many projects that can make the Earth's layers exciting for the kids. This lesson deals with ideas that are abstract to the students therefore it bores them. I think utilizing the makey-makey to create an interactive poster about the Earth's layers is a perfect way to make this unit a little bit more exciting. I think the last couple of weeks have really shown me how much potential makey makey and scratch have when they are put together.
My inspiration for this project came from this project here:https://www.instructables.com/Learning-the-Structure-of-the-Earth/. This was a small poster that utilized push pins as the buttons. I didn't have push pins so I opted to make my buttons out of paper clips and to make a large poster. I coded the makey makey arrows to correspond to each layer of the Earth. I then connected the alligator clips to the paper clips on my poster. I added sounds and titles. I did have a few glitches in scratch this time. I think if you put a lot of code into one event, it sometimes misses some of the code. For instance, my sound would only play about half the time or it would be delayed and start playing it halfway through the recording. I was having major WIFI issues at home when I was working on this project so that could have been the root of the problem. One thing I didn't understand before this was how to use the letter shown on the back of the makey makey. I found a youtube video that explained those and I was able to set one to be my reset button for my interactive poster.


Race Track
For this project I had fun with my 6-year old coming up with a game for the Makey Makey. Since he has a million Hot-Wheel cars and tracks we decided to use those for our inspiration. I am also teaching Physics at school so this was a perfect combination. So in the end my finished project is a hot wheel track that times the car moving down the track. Then in the game on scratch, the user has to calculate their speed based on the time and distance. I left the slider on the distance visible so a person could make the track any length but then still be able to solve for the speed of their car.


